I always leave the house thinking I’ll only be out for an hour, and come back two tides later with pockets full of bait, a soggy map and — if I’m lucky — a few good photos to show for it. Early on I learned the hard way that lugging big camera bags and heavy lenses along rocky ledges and windy banks isn’t worth the shots I get. Over the years I’ve built a compact photo kit that fits in a small sling bag, survives salt spray and wind, and lets me document shore reports without slowing my fishing down. Here’s how I put that kit together and how I use it on the bank.
Why bother with a dedicated compact kit?
Onshore photography for fishing is different from studio work. You need gear that’s light, weather-resistant, fast to deploy and forgiving when you’ve got cold fingers. I want images that show species, rigs, the coastline and the moment — not a blurred mess or a photo of my boot. A compact kit lets me be nimble: I can cast, land, and photograph quickly, then get back to fishing.
My kit philosophy
I follow three rules:
- Lightweight over perfect: I’ll accept a small trade-off in ultimate image quality for gear I actually carry.
- Weather-ready: Salt and spray are constant. Waterproofing and easy-to-clean gear matter.
- Fast to use: Setups that require lots of fiddling are left behind. If it takes more than 30 seconds to get a usable shot, it’s too slow.
Camera choices: smartphone vs compact vs mirrorless
These days my phone is my go-to for quick shots — recent flagships (iPhone 14/15 Pro, Google Pixel, Samsung S-series) produce excellent results, especially for wide shots and quick fish snaps. I always keep mine in a waterproof case like an OtterBox or a thin dry pouch so I don’t hesitate to use it when there’s spray.
But I also carry a small mirrorless body when I want better low-light performance or more control. My current pick is a cropped-sensor mirrorless (Sony a6000 series / a6400, Fujifilm X-T30 or Olympus OM-D E-M5 Mk III). These bodies are compact, have good autofocus and pair with small, sharp lenses. If I really want to push image quality in a compact package I’ll reach for a full-frame compact like the Sony RX100 series, but mirrorless gives more flexibility with lenses.
Lens choices that cover everything
For a compact kit I stick to one or two lenses:
- Wide to standard zoom (16–50mm or 18–55mm equivalent): This covers landscapes, tackle shots and environmental portraits. It’s my “do everything” lens.
- Short tele (35mm or 50mm prime, or 55–200mm zoom if space allows): For headshots of fish, details and compression of the coastline. A 50mm prime is tiny and sharp; a 55–200mm zoom is heavier but useful if you want to stay back from cliffs or photograph birds and distant boats.
On my mirrorless I often carry the kit zoom and a 35mm f/1.8 or 50mm for low-light and clean background shots. Primes are inexpensive and compact — great for sharper fish portraits with nice background blur.
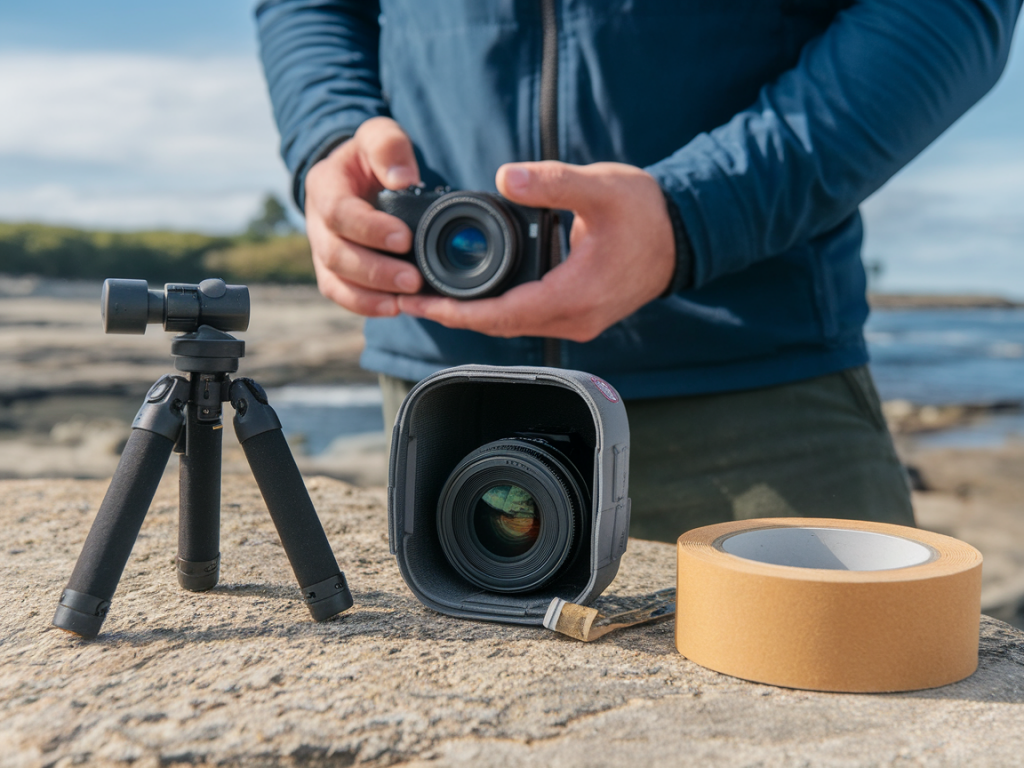
Essential accessories
- Small, sturdy tripod / tabletop tripod: A mini Gorillapod or a lightweight carbon-fibre travel tripod. Useful for time-lapses, repeatable compositions and self-portraits when I’m holding rods.
- Polarising filter: Cuts glare off wet rocks and water, boosts colour — especially valuable for shoreline shots.
- Dry bag or waterproof pouch: Keeps camera and phone safe when the tide comes in suddenly. I use a small 2–5L dry bag inside my sling.
- Lens cloth and sensor pen: Salt and sand get everywhere. I clean lenses between shots and give sensors a quick check when I’m back home.
- Extra batteries and a small power bank: Cold drains batteries fast. I never leave without one spare battery in the camera and a power bank for my phone.
- Memory cards: Two cards — one in the camera, one in a sealed case as backup. I format cards on the go seldom; instead I swap and leave cards in a safe pocket.
- Small LED light or headlamp: For night or low-light fish-handling shots, and for rigging when dusk arrives.
Packing smart: how I carry everything
I use a compact sling bag with a water-resistant outer fabric. The camera sits in the main compartment with a padded divider; pockets hold my phone in a dry pouch, battery, filters and a small cloth. I keep the tripod attached to the outside with quick straps or clip it to my belt when I’m moving a lot. The smaller the bag, the more likely I am to take it every session.
Shooting tips on the bank
Here are the practical habits that make my photos usable and shareable:
- Think of the story: I aim to capture one hero image (the fish), plus supporting shots (rig, tackle, location, hands-on-deck). A short sequence of 4–6 images tells a better story than one great photo.
- Use natural light: Early morning and late afternoon give the best colour. Overcast days are forgiving for skin tones and reduce harsh shadows on wet fish.
- Get low: For fish shots I crouch down so the camera is level with the fish — this makes the subject look bigger and more intimate.
- Mind your background: A busy background distracts. Use a short depth of field (wide aperture) to blur clutter and highlight the subject.
- Fast shutter for action: I raise shutter speed if the fish is wriggling or when shooting one-handed with a phone — 1/500s or faster for sudden movement.
- Respect the fish: Photograph quickly, wet your hands, and keep the fish supported. I never hold a fish vertically by the jaw for long just for a photo.
Phone-specific tips
Smartphones are deceptively powerful. Use portrait mode for shallow depth of field, lock exposure and focus by tapping and holding the screen, and use burst mode for quick-moving subjects. I also use simple apps (Snapseed, Lightroom Mobile) for quick edits: crop, exposure, sharpening and a subtle contrast boost — nothing heavy-handed.
Workflow and storage
On return I copy RAW files to a laptop and back them up to an external drive and cloud storage (I use Google Drive for quick sharing and Backblaze for long-term backup). I batch-process images in Adobe Lightroom or Darktable: a preset for coastal colours saves time. For the blog I export web-sized JPGs at 72ppi with a maximum dimension of 2000px — that balances quality and load speed for Fishing In Wales Co.
Protecting gear from the coast
Salt is the enemy. After each session I wipe down bodies and lenses with a microfiber cloth, check lens mounts, and let gear air-dry in a shaded place before storing it. Once a season I give everything a deeper clean and check seals and ports for corrosion. For extra peace of mind, keep silica packs in your bag to soak up moisture.
Minimal kit checklist (table)
| Camera | Phone + small mirrorless or compact (optional) |
| Lens | 16–50mm kit zoom + 35mm or 50mm prime (or 55–200mm if needed) |
| Support | Mini tripod / Gorillapod |
| Protection | Dry bag, phone case, silica packs |
| Power & storage | Spare battery, power bank, 2 memory cards |
| Extras | Polariser, lens cloth, headlamp, small towel |
I tweak my kit depending on the trip: if I’m chasing nocturnal species I prioritise low-light lenses and a better headlamp; for cliff-top sessions I bring the longer zoom. Building a compact photo kit is about choices — what you’re willing to trade for mobility — but with a small, reliable setup you’ll find documenting shore reports becomes as effortless as casting a lead. Tight lines and sharp images.